St. Patrick’s Day Sensory Play: 3 Easy Bins for Babies and Toddlers
- Jolene Phillips
- Mar 13
- 6 min read
This week, we made a few St. Patrick’s Day-themed sensory bins, and I wanted to share what we included in each one and how easy they were to put together.
I’ll walk you through the three different kits I made for my kids, their ages, and a little bit about the benefits of sensory-based play.
Everything we used for our kits came from Hobby Lobby or one of the Dollar Stores (Dollar Tree, Family Dollar, or Dollar General). I had a few items I ordered from Amazon, though. Many of the items were things we already had in our sensory bin supply cabinet and simply reused.
But before we dig into what’s inside each kit, let’s talk a little about sensory-based play.
What Is Sensory Play?
Sensory play is any activity that engages a child’s senses. This includes touch, sight, sound, smell, and sometimes taste. For young children, sensory play is one of the most natural ways they explore and understand the world around them.
When children scoop, pour, squish, sort, or explore different textures, their brains are building important connections. These simple activities support a wide range of developmental skills.
Some of the benefits of sensory play include:
Developing fine motor skills
Encouraging problem-solving and curiosity
Supporting language development as children describe what they feel and see
Helping with emotional regulation
Providing opportunities for independent exploration and creativity
Sensory play also meets many children’s natural sensory needs. Some kids seek out tactile input (touching, squeezing, digging), while others benefit from the calming focus that sensory play can provide.
Ways to Incorporate Sensory Play at Home or in the Classroom
Sensory play doesn’t need to be complicated or expensive. A simple bin with a few interesting textures can keep kids engaged for a long time.
Some easy ways to incorporate sensory play include:
Sensory bins filled with dry items like rice, beans, pasta, or chickpeas
Play-dough or air-dry clay with loose parts to press into it
Water play with scoops, cups, and small toys
Texture exploration using pom-poms, beads, or fabric scraps
Seasonal or themed sensory bins tied to holidays or books
Many families and classrooms like to keep a small collection of reusable sensory materials that can be mixed and matched for different themes.
That’s exactly what we do in our house.
We have a designated sensory bin storage cabinet for reusable materials such as beads, pom-poms, tweezers, scoops, and themed items. This makes it easy to build a new sensory bin without buying all new supplies each time.
Sensory Bin #1: My Twins’ Bin (Age 1)

The first kit I made this week was for my twins. The girls turned one in February, so I focused on larger items with varied textures that would be interesting and safe for them to explore.
At this age, sensory play is mostly about touching, grabbing, squeezing, and investigating objects.
Their kit included:
Leprechaun toy (I love the texture on this one)
Two different types of green pom-poms
one with a very soft texture
one more of a coarse texture
Horseshoe and clover charms (these were table scatter from Hobby Lobby)
Empty pot of gold
Rainbow pop-it fidget
Medium-sized rubber ducks
The girls absolutely loved exploring these items.
At this age, a lot of chewing on objects happens as part of exploration. These were all items I felt comfortable with the girls putting in their mouths while I sat right next to them.
Of course, always supervise young children during sensory play and use items you feel comfortable allowing your child to explore. Many sensory bin items aren’t technically toys, so use your own judgment when choosing materials. These are simply the items we used.
And honestly, if we pull this bin back out again, I’ll probably add a small handful of Lucky Charms cereal for the girls to snack on while they play. It fits the theme and adds another fun texture.


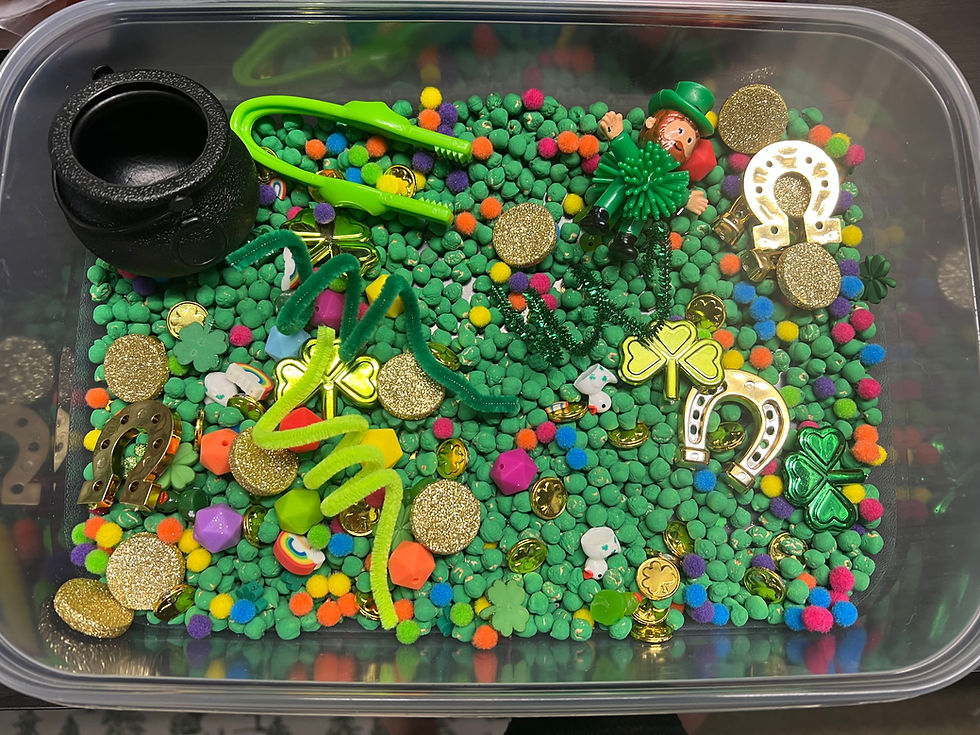
Sensory Bin #2: My Son’s Bin (Almost 3)
Next is my son’s sensory bin.

He will be three in May and absolutely loves sensory activities. Because of that, his bin includes more fine-motor activities, such as scooping, sorting, and picking up small objects.
For his base material, we used green dyed chickpeas, which give a really fun scooping texture.
His bin included:
Green painted chickpeas (instructions below)
Empty pot of gold
Leprechaun toy (I ordered a 12-pack from Amazon, the girls had the same Leprechaun toys in their bin)
Horseshoe and clover charms
Foam gold coins (from the St. Patrick’s Day craft section)
Mini St. Patrick’s Day duck charms
Green pipe cleaners
Green kid’s tweezers
Silicone rainbow beads
Mini pom-poms
Mini gold coins (taken from a gold coin garland)
Many of these items were things we already owned, including the beads, pom-poms, and tweezers.
Having reusable sensory materials makes it really easy to build themed bins without constantly buying new supplies.
As he gets a little older, I plan to add simple challenge cards to this bin. For example:
“Put 3 gold coins in the pot.”
“Find 5 clovers.”
“Fill the pot with green items.”
But right now, he mostly enjoys open-ended, unstructured play, which is exactly what sensory bins are great for.
Sensory Bin #3: St. Patrick’s Day Play Dough Bin
Our third bin is a play-dough / air-dry clay sensory kit.

This one is also for my son, but it focuses more on pressing, squishing, and creating.
I reused several items from his main bin:
Rainbow beads
Gold coins
Duck charms
green pipe cleaners
Then I added:
Green pom-poms (the same ones from his sisters’ bin or our Dr. Seuss bin)
Three shades of green pony beads (great for pressing into dough)
The play-dough and pony beads came in a small set from Dollar General, and they also sell colorful air-dry clay there.
The only items I actually purchased specifically for this kit were the play-dough and pony beads, which cost about $3 total.
Everything else was reused.
I also reuse the container for other play-dough kits, so the supplies can rotate through different themes.
Sensory Bins Don’t Have to Be Expensive
One of the biggest misconceptions about sensory play is that it has to be expensive.
It really doesn’t.
For example:
A bag of chickpeas costs around $1 and gives about 2 cups.
My son’s bin used 4 cups total, so about $2 worth.
If you’re starting completely from scratch, your first bin might cost a little more. But once you have some basic materials, you can reuse them over and over again for new themes.
And honestly, if you don’t want to spend anything at all, you can create a sensory bin using items you already have in your kitchen or craft supplies.
Here are some more ideas using things you might already have at home.
Base Fillers (Main Sensory Material)
These create the main texture of the bin.
Kitchen Items
Dry rice (can dye green with food coloring)
Dry pasta (bows or elbows look fun)
Dry lentils or split peas
Oats
Cornmeal
Popped popcorn
Dried beans (green, white, or mixed)
Easy Coloring Tip
Add rice or pasta to a bag with green food coloring + a splash of vinegar, shake, then let dry.
Rainbow or Gold Elements
These add color, sorting, and treasure-hunt play.
Kitchen Items
Gold-wrapped chocolate coins (or foil-wrapped candies)
Yellow popcorn kernels for “gold”
Rainbow cereal pieces
Fruit loops for sorting by color
Colored sprinkles
Craft Supplies
Gold pom-poms
Yellow beads
Plastic coins from craft kits
Rainbow pony beads
Green buttons
Leprechaun-Themed Pieces
Simple imaginative play items.
Kitchen Items
Bottle caps (treasure)
Muffin liners (pots or hats)
Mini measuring cups/spoons
Craft Supplies
Pipe cleaners twisted into rainbows
Green felt circles (shamrocks)
Paper shamrocks
Craft sticks for building “ladders” or “bridges.”
Small cardboard “pot of gold”
Scooping & Fine Motor Tools
Items kids love using in sensory play.
Kitchen Tools
Measuring cups
Measuring spoons
Small bowls
Whisk
Tongs
Ice cube trays (sorting gold coins!)
Craft Tools
Small cups
Tweezers
Mini baskets
Plastic scoops
Mini Play Ideas
You can turn the bin into little themed activities:
Pot of Gold Hunt: Hide “gold coins” in rice or oats and have kids dig to find them.
Rainbow Sorting: Kids sort colored cereal, beads, or pom-poms into rainbow order.
Leprechaun Bakery: Use muffin liners and measuring spoons to pretend they’re baking “rainbow cupcakes.”
Treasure Counting: Count coins into measuring cups or ice trays.
How to Dye Chickpeas with Acrylic Paint
We used this same method for our Dr. Seuss sensory bin, and it works great.
Supplies
Dry chickpeas
Acrylic paint
Large zip-top bag or container with lid
Parchment paper or wax paper
Instructions
Pour your dry chickpeas into a large zip-top bag or container with a lid.
Add a small amount of acrylic paint. You only need about 1 teaspoon per cup of chickpeas.
Seal the bag or container and shake until the chickpeas are fully coated.
Spread the chickpeas out on parchment paper, aluminum paper, or wax paper to dry.
Let them dry for several hours or overnight.
Once dry, they are ready to use in your sensory bin.
The paint dries quickly and gives the chickpeas a fun, colorful coating that works great for scooping and pouring activities.
If you make a sensory bin for St. Patrick’s Day or another theme, I’d love to hear what you included! Sensory play is one of our favorite ways to explore, learn, and have a little fun together.


Comments