Dr. Seuss–Inspired Sensory Bins for Read Across America Week
- Jolene Phillips
- Feb 25
- 5 min read
A Seussical Start to Sensory Play
Oh, the bins you will fill!
Oh, the scoops you will spill!
With chickpeas and pompoms and colors so bright,
We’ll scoop, and we’ll sort, and we’ll play with delight!
With tweezers that pinch and tubes that POP-POP,
With letters to find and beads to drop-drop,
It’s Read Across America, hip-hip-hooray!
Let’s learn as we giggle, play, and play and play!
In honor of Read Across America, we’re celebrating with bright colors, playful textures, and hands-on learning inspired by the whimsical world of Dr. Seuss.
Today I’m sharing three simple, affordable sensory kits we’re using in our home, and how you can easily recreate something similar without stress, overwhelm, or Pinterest-level pressure.
Because here’s the truth:
Sensory bins don’t have to be elaborate.
They don’t have to be expensive.
They just have to invite play and learning
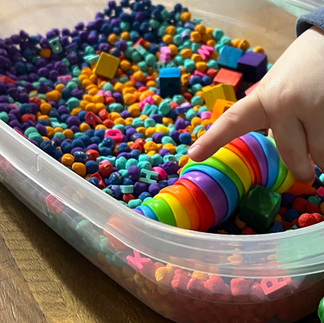
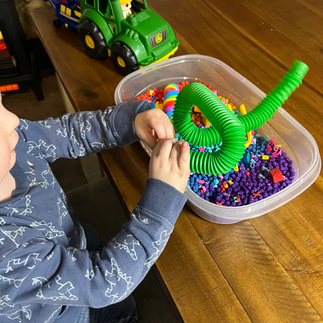
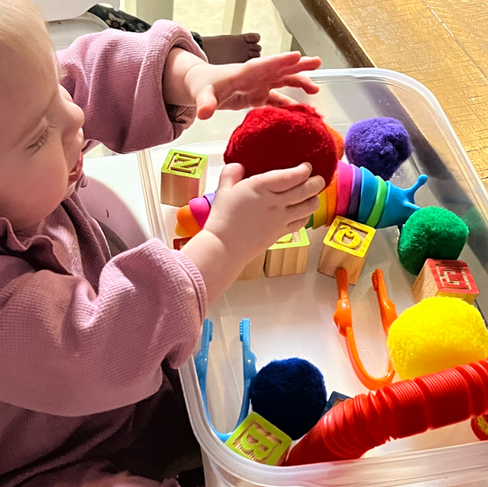
Kit #1: My Almost-3-Year-Old’s Main Sensory Bin This Week

This is my son’s primary bin for the week, and it’s been a huge hit.
What’s inside:
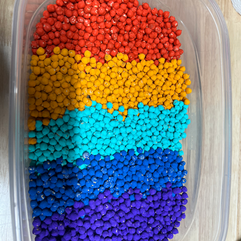
Acrylic paint–colored chickpeas
Plastic tweezers
Pop tube sensory toy
Slug fidget
Rainbow blocks
Rainbow polymer clay letters
He’s used the pop tube to slide chickpeas down, stretched it for the satisfying sound, pushed his slug fidget through the chickpeas, hunted for letters, and even brought in his construction vehicles and monster trucks to join the fun.
Unstructured play is my favorite part. I don’t tell him how to use it; I let him explore. And the way he plays? It won’t look exactly like the way your child plays. That’s the beauty of it. This kit could be presented to my 4-year-old niece, 6-year-old nephew, and 8-year-old niece, and they would play with it in a different way. Even the twins with identical kits play differently.
If I were doing this at home without buying anything new?
I’d grab:
A box of pasta (paint it or leave it plain)
Craft pompoms
Pipe cleaners
A spoon and a cup from the kitchen


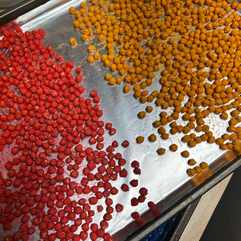
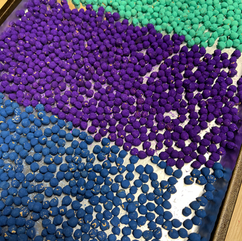
How I Colored the Chickpeas (It Was So Easy!)
I truly thought this would take forever. It didn’t.
Divide dried chickpeas into sandwich-size Ziploc bags (I used two packs and made 5 colors).
Add a small dollop of acrylic paint (start small, you can always add more).
Seal the bag with air inside.
Shake until coated.
Spread onto a foil-lined cookie sheet in a single layer.
Shift around after 15 minutes to prevent sticking.
Let it dry overnight to be on the safe side.
Hands-on time? Less than 5 minutes. Clean-up time, almost none!
(And yes, parchment paper works better than foil. I just didn’t have any on hand!)


Kit #2: Modified Bin for My One-Year-Old Twins

For my girls, the setup looks different, and that’s intentional.
Their bin includes:
Oversized rainbow pompoms
Alphabet blocks
Larger slug fidget
Plastic tweezers
Pop tube fidgets
Because their developmental stage is different, their bin is simplified and focused on:
Texture exploration
Cause-and-effect sounds
Banging and scooping
Dumping and refilling
I considered using colorful cereals like Trix, Froot Loops, or Fruity Pebbles for a rainbow filler (great edible option for younger toddlers), but we were taking this bin to library story time, so no food this round.
If I were doing this at home without buying anything new for the girls?
Large, colorful Duplo blocks and Cheerios are more than enough. They can scoop, shake, bang, dump, and explore. At this age, curiosity doesn’t require complexity.


Kit #3: Play-Dough Kit

This kit was created entirely from Dollar Tree and Dollar General finds.
Inside:
Red and blue air-dry clay
Red, blue, and clear faux gemstones
Alphabet and number beads
Green and teal pompoms
Cost? Around $7 (to buy everything new and considering half of the stuff will be used in other kits because it didn’t fit in this container).
My son will be able to press beads into clay, hide gems, squish pompoms in, and build little creations. Fine motor work disguised as play. He's still focused on his other bin, so I don't have pictures of this one in action, yet!
Why Sensory Bins Matter
Sensory bins may look like play, and they are, but they’re also building:
Fine motor strength
Bilateral coordination
Early literacy (letter exposure)
Problem-solving
Cause and effect understanding
Language development
Independent play skills
For babies: sensory input and brain wiring.
For toddlers: experimentation and exploration.
For preschoolers: creativity, early academics, and imagination.
For elementary age: all of the above and more!
Learning through play is foundational and powerful. As Maria Montessori said “Play is the work of a child.”
Let’s Talk Budget & Accessibility
Each bin costs around $10 to create. This was when we bought everything brand new. And honestly, there are so many leftover or reusable supplies for other kits (and it will cost less if using what you have).
We store ours in gallon Ziploc bags between uses, so our clear plastic bins stay free for the next theme, or so I can pull and use supplies from a different-themed bin.
But hear me clearly:
You do NOT have to buy new items.
You do NOT have to make it elaborate.
You do NOT need hours of prep.
A spoon, a cup, and dry rice? Sensory bin.
Plain pasta and dump trucks? Sensory bin.
Cheerios and Duplo blocks? Sensory bin.
That’s it.
We’re not striving for perfection.
We’re not striving for Pinterest-level parenting.
We’re creating an invitation to play and learn.
Safety Notes
Use non-toxic paint.
Be mindful that some dried beans are not safe to ingest uncooked.
Modify items based on your child’s age and oral tendencies.
Always supervise play.
Choose larger items for younger children to avoid choking hazards.
Use your best judgment. You know your child best.
Add a Book for Extra Learning
One of my favorite ways to enhance sensory play is to pair it with a book.
During Read Across America, pull out a favorite Dr. Seuss story or write your own silly rhyme. Let the book inspire the colors, textures, or theme of your bin.
It doesn’t have to be complicated. It just has to be joyful.
The Heart Behind This Post
So often parents tell me:
“I don’t know where to start.”
“I don’t have time.”
“I’m not creative enough.”
You are.
Start small. Use what you have. Let your child lead.
Sensory bins are simply a jumping-off point.
And when your child asks for their bin before breakfast?
When they want to bring it to bed?
When they take it to library story time?
That’s when you know you’ve hit the sweet spot.
Let’s See Yours!
If you create a sensory bin for Read Across America week, or any theme this week, I would LOVE to see it.
Share it in the comments on Facebook or email me at guidedbygiggles@gmail.com so I can share it.
Your ideas inspire other families more than you know.
Let’s keep learning, playing, and letting giggles guide the way.


Comments